

|
|
|
|
|
|
When you run the Direct Credit Schedule, you create two files:
This topic shows how to select the destination for the report. It uses the Save to file option, and the report file destination is the My Documents folder.
You are on the View Report Groups | Reports tab.
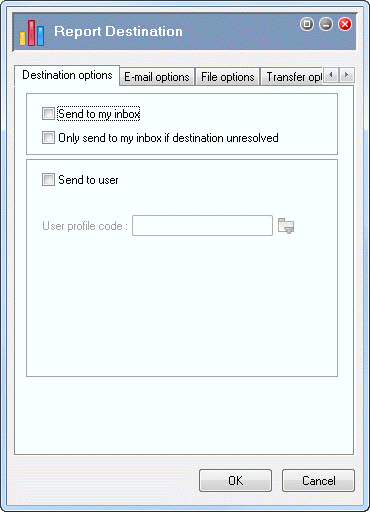
The Report Destination | Destination options tab appears.
Important: Ensure that the Send to my inbox checkbox is not selected or Exolvo will send both files to the Inbox.
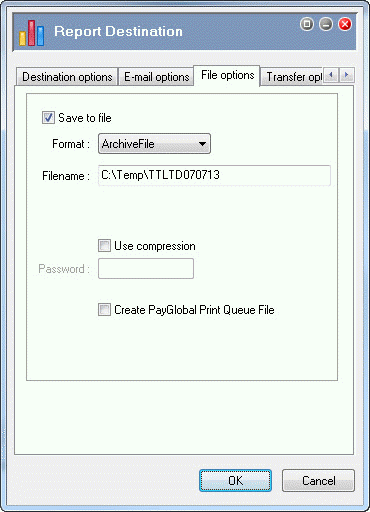
These tab page fields control the destination and format of the report file. You can save your report files to any destination, but this example sends them to your Temp folder.
Field |
Value |
Details |
|---|---|---|
Save to file |
|
Activate the fields on the File options tab. |
Format |
ArchiveFile |
Default value. After you double-click Send and Receive, Exolvo will save the report file in your Outbox as a .RAZ file in the location specified in the Filename field. You can open the RAZ file with the PayGlobal Report Viewer. |
Important: Do not select ReportTextFile in the Format field if the report file is going to the same destination as the banking text file, otherwise the banking text file will overwrite the report file. |
||
Filename |
Enter the full file path to your Temp folder. Include a meaningful name for the report file, such as the company name and period end date. For example, C:\Temp\TTLTD070713. You do not need to add a file extension, such as .TXT, to the file path. Exolvo will create the file based on the value in the Format field. If you add an extension, Exolvo will base the report on the extension type, not the format specified. If you do not want a copy of the Direct Credit Schedule report file or if you only want to use the banking text file, delete the report file from your Outbox after you run the Direct Credit Schedule. |
|
Important: The path in the Filename field determines where the report file is saved, not where the banking text file is saved. The banking text filename is recorded in the Administration | Company Settings | Payroll | Banking | Direct credit file name field — see Check Direct Credit Export Filenames. |
||
Use compression |
|
If you select this checkbox, Exolvo will generate the report as a zip file. You can also specify a password that the recipient must use to open the zipped report file. |
Create PayGlobal Print Queue File |
|
If you select this checkbox, Exolvo will create a file that is used by the PayGlobal Print Queue application. |
Note: If you do not require this field, you can hide it — see Appendix - Hide the "Create PayGlobal Print Queue File" Field. |
||
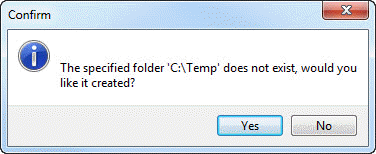
If the folder specified in the Filename field does not exist, the following enter of Confirm box appears.
|
|
Topic: 39248
